MAPI Connector |
|||||||||||||||||||||||||||||||||||||||||||||||||
|
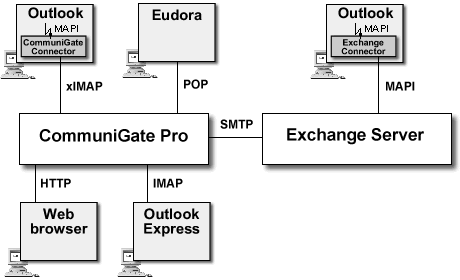
The MAPI infrastructure provides an additional level of abstraction. Windows applications do not deal directly with a groupware server (or any other "data store"). Instead, applications send Messaging requests (such as "list my mailboxes", "retrieve message number X", etc.) to the MAPI component, and the MAPI component uses the installed "Connector" modules to send those requests to an Exchange® server, to locally stored "personal folders", to a fax server, etc.
The expandable nature of the MAPI architecture allows for creation of additional "Connectors" that can interact with various server products. One of the problems that such a Connector has to solve is data format: Windows applications send data objects via MAPI to Connector modules in the so-called "MAPI object" format that has very little in common with any Internet format. The CommuniGate Pro MAPI Connector converts the MAPI data into one of the standard Internet formats and stores the converted "messaging objects" as standard Internet messages in a CommuniGate Pro mailbox. When reading those mailboxes, the CommuniGate Pro MAPI Connector converts messages back into the "MAPI object" format and passes the converted objects back to MAPI and Windows applications (such as Outlook).
Because the standard Internet formats are used, messages stored with the CommuniGate Pro MAPI Connector can be read using any standard POP3 or IMAP mail client or the CommuniGate Pro WebUser Interface:
Start the unpacked Setup.exe application to install or update your CommuniGate Pro MAPI Connector software. After successful install, the application may ask you to re-create your Mail Profile.
You can use the same Setup.exe application to uninstall the MAPI Connector software from the workstations.
The MAPI Connector Setup.exe program can be started in the silent mode (without any user interface dialogs) using the following command-line parameters:
/i | install or upgrade the MAPI connector |
/r | remove the MAPI connector |
/q | do not ask for profile configuration |
/Q | do not display error messages |
The cgmxui32.inf file can be used to automatically set the the MAPI Connector Account Settings and Shared Accounts. Download this file and modify it to fit your needs, then place it into the same directory where the Setup.exe application resides. The application will use it during the installation process.
If you use Outlook 98 or Outlook 2000 check that it is configured to run in the "groupware mode". Start Outlook, and
select the Options item from the Tools menu. The Options dialog box appears. Select the
Mail Services Tab and click the Reconfigure Mail Support button to open the E-mail Service Options
dialog box. Check that the Corporate or Workgroup option is selected.
Note: you may need the MS Office installation CD-ROM to complete Outlook mode switching.
Open the Mail Control Panel and click the Show Profiles button. The list of Mail profiles appears. If the CommuniGate Pro MAPI Installer has instructed you to re-create your existing Profile, select the old Profile and click the Remove button.
Click the Add button to create a new Profile. Depending on the version of the Outlook and the Mail control panel installed, you will see several dialog boxes. If you see a dialog box with the Additional Server Types option, select that option. Select CommuniGate Pro Server as the "service" or "additional server type".
You can add other services into the same Profile.
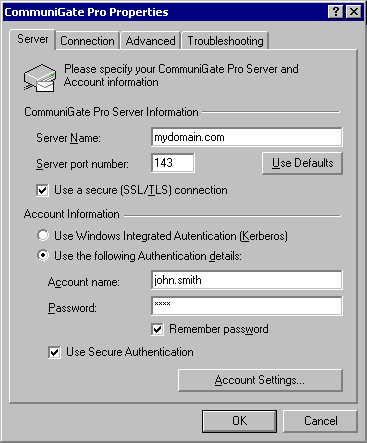
The Server panel allows you to specify the CommuniGate Pro Server and Account data:
If you want to use this option, make sure that:
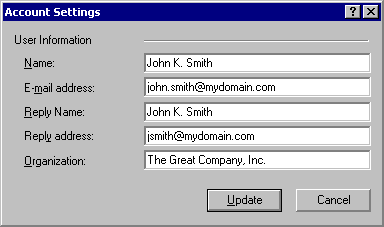
The Account Settings dialog box can be opened by pressing the Account Settings button on the Server panel. The box allows you to specify the MAPI Account name and other general data:
The Connection panel allows you to select your network connection method.
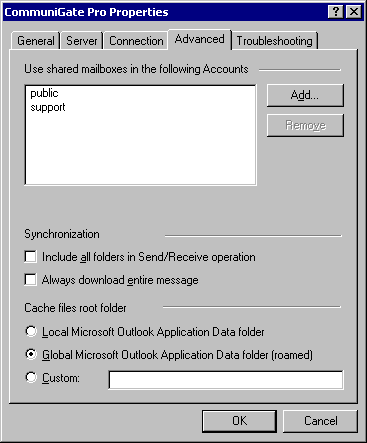
The Advanced panel allows you to specify other CommuniGate Pro Accounts you want to work with.
Use the Add and Remove buttons to specify the names of other CommuniGate Pro Accounts. If you want to access an Account in a different Domain, specify the full name: accountName@domainName.
The Account owners must grant you Mailbox Access Rights, otherwise you won't be able to see and open mailboxes in those Accounts. See the Sharing section for more details on foreign mailbox access.
The Synchronization settings allow you to override the selection of folders to work with in the Offline mode.
Use the Cache files root folder settings to specify where the MAPI Connector should store its local cache. The local cache is used for most MAPI Connector operations, it also allows you to use the MAPI applications (such as Outlook) in the off-line mode.
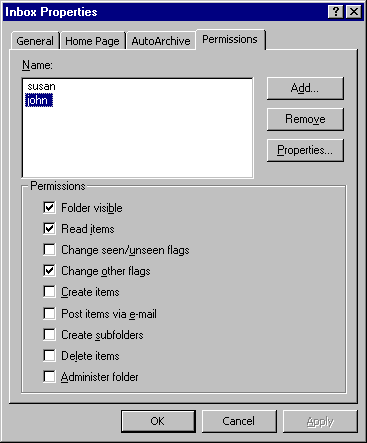
Select a mailbox in the Outlook Folder List, and use the Properties menu item to open the Properties dialog box. Open the Permissions panel:
Use the Add and remove buttons to specify the Accounts and other identifiers to specify those who should have access to this mailbox.
Select an identifier in the list and use the checkboxes to grant required access rights to
this identifier. See the Mailboxes section for more details on mailbox ACLs.
Note: a user needs to have the Admin Access Right in order to specify the default
Mailbox (Folder) View.
Note: Make sure your CommuniGate Pro Account limits allow the MAPI Connector to store the file with your Free/Busy information in your Personal File Site area.
This feature allows users of Outlook and other calendaring clients to access your Personal File Site via HTTP and retrieve your Free/Busy information. The URL for the CommuniGate Pro Connector user Free/Busy information is
In order to process Appointments and Meetings, the Outlook application on the client machine should be able to access the Free/Busy information of other users. This operation is not implemented via the MAPI Connector and should be done by the Outlook application itself. To configure your Outlook application:
This option will be used by the Outlook application when it needs to retrieve the Free/Busy information for an E-mail user. The application substitutes the %SERVER% symbols with the domain part of the user E-mail, and the %NAME% symbols with the username part of the user E-mail, so for the E-mail address john@myserver.dom the Outlook will use the http://myserver.dom/~john/freebusy.vfb URL to retrieve John's Free/Busy schedule.
Note: the suggested Search URL will work only if your CommuniGate Pro Server accepts WebUser Interface connections on the port 80. If it accepts them on the default port 8100, or on any other non-standard port, the Search URL must include that port:
Note: the suggested Search URL will work only if your CommuniGate Pro Domains have names that have A-records pointing to the CommuniGate Pro server. Often, the DNS system does not contain any A-record for your mydomain.dom Domains, or those records point to a different system (company Web server), while the CommuniGate Pro Server addresses are specified as mail.mydomain.com, or cgate.mydomain.com, or mx.mydomain.com or similar DNS A-record(s). In this case the Search URL must be modified to use the proper domain names:
Note: if your CommuniGate Pro server is serving only one Domain, then you can specify the Search URL as:
The Search URL may be used to retrieve the Free/Busy Information for users of other CommuniGate Pro Servers, as long as the Search URL correctly represents their Free/Busy file URLs. To overwrite the Search URL and specify a different (correct) path to some remote user Free/Busy file, create a Contact record for that user, click on the Details tab and enter the correct FreeBusy file URL into the Internet Free-Busy Address field. See the Microsoft Outlook manual for more details on these settings.
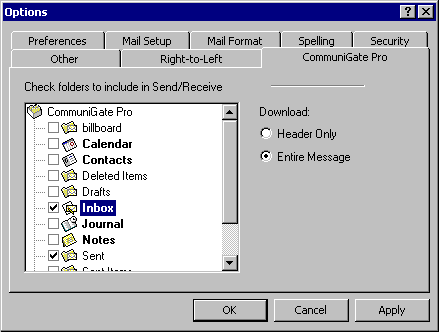
Use the Options item in the Outlook Tools menu to open the Options dialog box. Then open the CommuniGate Pro panel:
Use the Outlook Tools->CommuniGate Pro Server menu to synchronise the changes you do in the Offline mode with the CommuniGate Pro server.
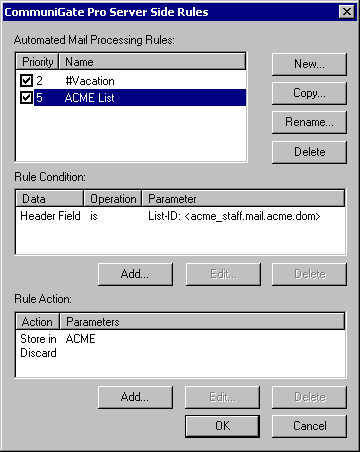
Use the Tools->CommuniGate Pro menu to open the Rules editor window:
Click the New button to create a new Rule. New Rule has no condition and no action.
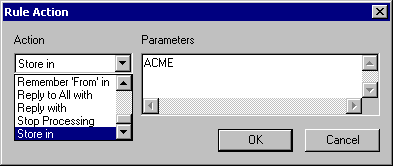
Click the Add button to add Rule conditions and actions:
See the Automatic Rules section for more details.
The MAPI Connector also retrieves the user Domain Mail Trailer setting. The content of that setting is added to all non-encrypted and not-signed text messages submitted via the MAPI Connector.
The values specified via the Account Settings panel are stored in the WebUser Settings, so both the WebUser Interface and MAPI sessions use the same From:, Reply-To:, and Organization values.
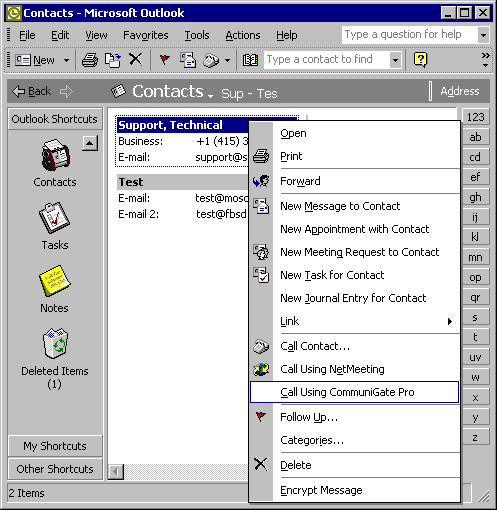
Outlook users can initiate a phone call using the telephone number specified in a Contact item. Right-click a Contact record to open a pop-up menu and select the Call using CommuniGate Pro item:
You can also use the CommuniGate Pro Server submenu in the Tools menu.
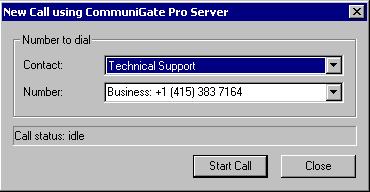
A dialog box with the Contact name and phone number appears:
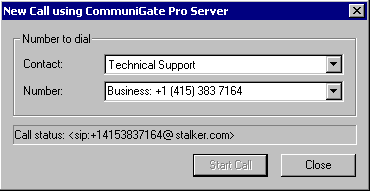
Click the Start Call button to initiate a call. All your SIP devices will start to ring immediately. Answer this call on any device, and the Server will instruct it to initiate a call to the selected phone number.
The dialog box has a field displaying the call status:
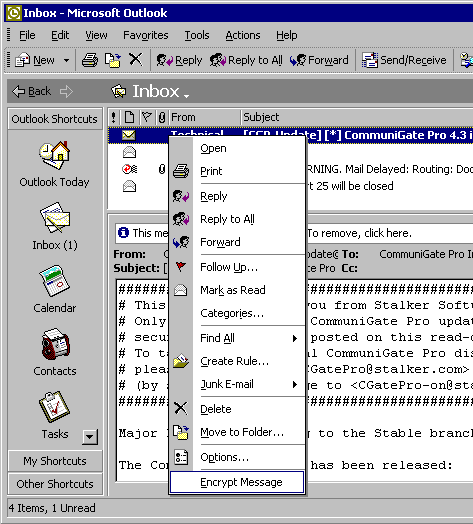
You may also want to improve security for certain messages received and stored on the Server in clear-text.
Right-click on the selected message in Outlook. A pop-up menu will open:
If you want to read Encrypted messages using your MAPI clients (Outlook) and the WebUser Interface, make sure that your Windows desktop system and the WebUser Interface have the same Private Keys and Certificates installed. You can either generate a key and Certificate in the WebUser Interface and then export them to your Windows desktop system, or you can export your keys from the Windows desktop system and import them into your WebUser Interface settings.
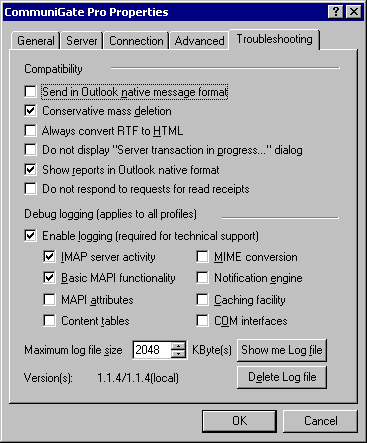
Open the Troubleshooting panel in the MAPI Connector ("CommuniGate Pro Service") setup box:
The panel displays the versions of both MAPI Connector software components: the starter code library installed on your desktop computer and the server code library retrieved from the CommuniGate Pro Server.
Select the Enable Logging option to start MAPI Connector log recording. The MAPI Connector Log keeps only the last records, so the Log file does not exceed the size specified in the Maximum Log File Size setting.
Use the checkbox controls to enable logging for various MAPI Connector components.
Click the Show Me Log File button to open a file directory window the Log file is stored in. You can use this feature to E-mail the Log file to Stalker Technical Support.
Click the Delete Log File to clear the Log file.
Use the Compatibility options to tune up the MAPI Connector operation for mixed environments.
The special Known MAPI Problems site lists all reported and known problems and provides the status update on them. Please consult this site first if you have any problem with the MAPI Connector functionality.